

Track a kid's iPad
Compare two apps
Self-host on a NAS
Audit prep
Partner privacy review
Track every app on a kid’s iPad
Audience:guardian. Goal: monitor. Install path: desktop app or Docker — whichever you’ll keep running long-term.
The job: get a clean view of everything installed on a child’s device, surface what’s high-severity, and notify you only when something actually changes — not every time Apple’s HTML reflows.
Set the focus on first run
Export the kid's app list
.txt of every installed app’s bundle ID and display name. If you’re not running from source, the helper is published as a stand-alone script under scripts/ios-app-import/ in the main repo — clone just that directory and run it; you don’t need the rest of the codebase.Alternatively, if you have ideviceinstaller installed (brew install libimobiledevice), use --mode device against the connected iPad without taking a backup.Bulk-import into privacytracker
.txt from step 2. privacytracker resolves each name through the iTunes Search API, shows you the ranked candidates in a confirm dialog, and starts the scrape once you accept. Apps it can’t resolve land in a needs review tab — usually misspellings or region-locked apps that need a manual App Store URL.Configure quiet hours and the bell
notifications.not_before, so changes detected overnight defer to morning. Quiet hours hold back only the bell: a notification webhook set to Each change still posts overnight changes as they’re found. If your kid uses different time zones (boarding school, holidays at a relative’s house), adjust under Settings → Notifications → Quiet hours.For the bell itself, leave the default Only when categories change filter on. Re-scrapes that produce no diff don’t add to the unread badge.(Optional) Enable AI for high-severity apps
collection_scope, product_use, ads_marketing, third_party_sharing, tracking_analytics, user_controls, data_retention, children_minors) — exactly the questions a guardian wants answered. Hosted providers run a fraction of a cent per app; a local Ollama setup is free at runtime.See Configuration → AI providers for the full setup. To keep it scoped, summarise apps one at a time with the Regenerate button on each app’s detail page — cover the high-severity apps and skip the kid’s wallpaper app.What success looks like
Compare two competing apps before installing
Audience:self. Goal: any. Install path: anything — this works fine on a desktop install you only spin up when you need it.
The job: you’re picking between two apps that do similar things — say, two journaling apps, two budgeting apps, two flashlight apps with surprisingly elaborate privacy policies. You want to see their privacy labels side by side without installing either one first.
Add both apps via App Store URL
?utm_source=... parameter on either URL or strip it; the parser only cares about the /id<digits>/ segment.Open the Compare view
/dashboard/compare). Pick the two apps from the dropdown.The Compare view shows privacy labels in a side-by-side severity-coded grid. Data Used to Track You lines up against Data Used to Track You, Data Linked to You against the same — so you can see which app has Location for tracking and which one only collects it for app functionality.(If AI is configured) read the policy summaries side-by-side
Annotate your decision
I'm picking app A because B sells aggregated data to advertisers and A doesn't). Tag it concern or positive. Set visibility to private if it’s just for you, export if you might share it later — see the next two recipes.Self-host on a home NAS for the household
Install path: Docker. Audience: any (the same instance can serve multiple household members; everyone uses the same browser-accessible UI). The job: run privacytracker on always-on hardware (Synology, Unraid, a Raspberry Pi, an old laptop in a closet) so the household can hit it from any device on the LAN, with the data backed up off-host.Set up Docker on the NAS
Pull privacytracker
./data/privacy.db on the NAS’s persistent storage. Confirm it survives down and up (with the same -f flags) before going further. Without the allowed host, the server refuses requests for privacytracker.lan; without trusting the proxy, it can’t see that the browser came in over HTTPS.Front it with a reverse proxy + TLS
privacytracker.lan resolves on the public internet, or self-signed certs for a LAN-only deploy. The Host header forwarding is non-negotiable — privacytracker enforces a same-origin CSRF check on every mutating verb, so a proxy that strips the Host header will cause every action to fail with 403 {"error":"Cross-origin mutation rejected"}. See Troubleshooting → Reverse-proxy CSRF rejection if you hit that.Lock down the destructive routes
audit_log as admin_token.login.invalid. There’s no UI for that table — review it with sudo sqlite3 data/privacy.db "SELECT datetime(created_at/1000,'unixepoch'), action, actor_ip FROM audit_log ORDER BY created_at DESC LIMIT 50;".For full hardening, see Security & trust.Set up off-host backups
./data/ to a different drive, ideally a different physical machine. The directory is private to the container’s user, so run it from root’s crontab:data/backups/, then sync those out. They’re off by default. See Backup & restore for the full options.What success looks like
https://privacytracker.lan, the 30-minute background sync runs unattended, the bell shows newly-changed apps without anyone needing to think about it, and data/privacy.db is replicated nightly to a different machine. The admin token gates POST /api/reset so a curious guest on the LAN can’t wipe the database.Back-fill a year of history before a regulator audit
Audience: any. Goal: any. Install path: Docker or desktop, with internet access. The job: an organisation needs evidence of an app’s privacy disclosures going back several months or years — for a DPIA, a regulator request, a custody-evaluation submission, or just a personal record. privacytracker’s Wayback importer walks every calendar quarter from Q1 2021 (1 February 2021) forward — the earliest era when Apple’s HTML carries privacy nutrition labels — and pulls the closest archive.org capture per quarter. For an app that’s been live the whole time that’s roughly 19 quarters of history. The parser auto-detects which era it’s looking at: the modernserialized-server-data blob (Nov 2025+) or the older Ember/FastBoot shoebox-media-api-cache-apps shape (Jan 2021 – Nov 2025).
Make sure every app of interest is tracked
.txt. See Quickstart → Import your first apps.Run the bulk Wayback import
?stream=1 flag gets you NDJSON events as the run progresses (batch-start, app-start, target, app-done, summary). Without it, the route returns once the run finishes.Expected result: most apps get 1-3 quarterly snapshots; some get none (“skipped, no capture”). For each empty quarter, the importer fires an archive.org Save Page Now request fire-and-forget, so a future run will pick up the newly-archived page.Wait, then re-run
snapshotsRequested counter in the summary tells you how many save-now requests went out — that’s the upper bound on how much new history the next run can find.Inspect the timeline
scheduled / manual / import / wayback) on each timeline row tell you the provenance of every snapshot.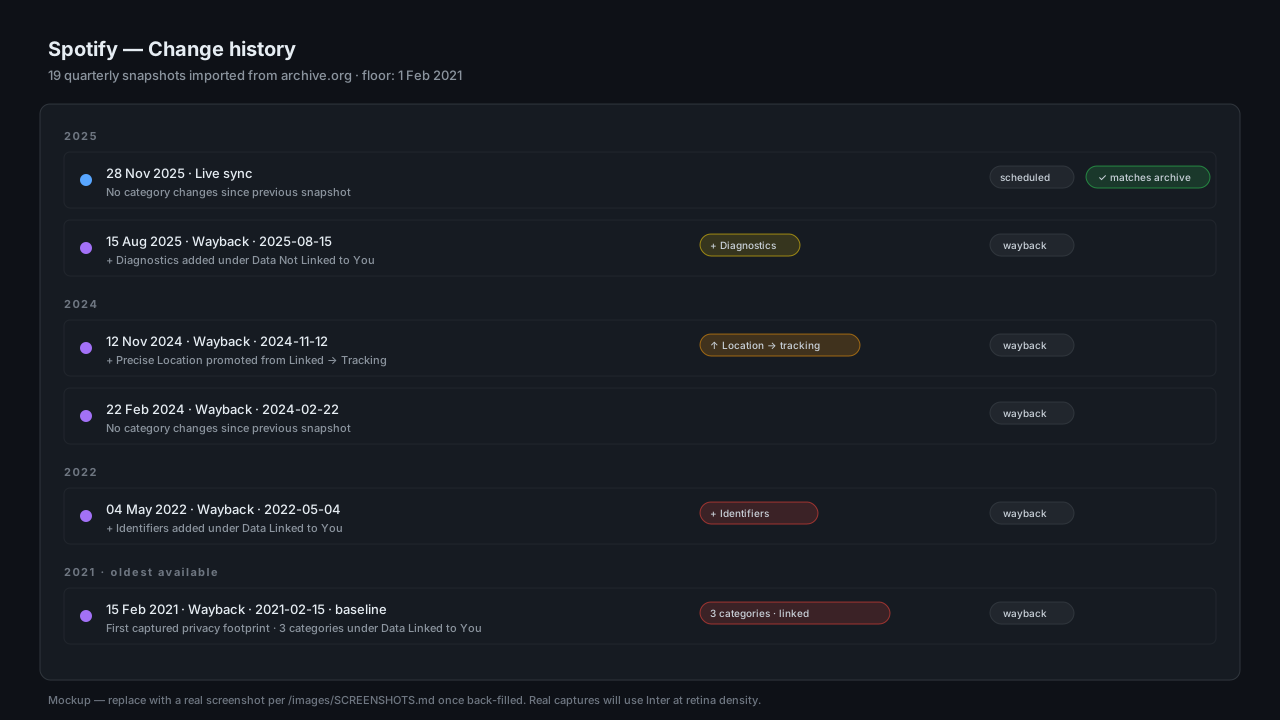
Per-app timeline after a full Q1 2021 → present back-fill (mockup)
Export an audit bundle
recommenderName (the attribution shown next to your annotations, defaulting to your friend), includeRecommenderProfile (defaults to true), and migrationFlow. Rate-limited to 5 exports per minute.The bundle is a versioned JSON file containing the apps, every snapshot (live + Wayback), AI summaries if you have them, and any annotations marked visibility = 'export'. Private notes are excluded by SQL filter at build time — there is no force-include.For long-term archive, store the bundle alongside the original Wayback capture URLs (they’re embedded in the bundle). The capture URLs use the id_ suffix (/web/<ts>id_/<orig>) so Apple’s HTML comes through clean of archive.org’s toolbar injector — meaning the capture is forensically usable too, not just human-readable.What success looks like
Run a privacy review with a partner or family member
Audience:loved_one. Goal: monitor. Install path: any.
The job: you and a partner (or another household member, or a friend you’re helping) want to look at your respective app collections together — comparing notes on what each of you has installed and how concerned you each are about specific apps. You don’t want to install another tool on their machine; you want to share a curated bundle they can read.
Set the audience to loved_one
loved_one audience rule resolves flag.settings.admin.export.audit_bundle to on, which is one of the two things POST /api/export/audit-bundle accepts — so the export is callable straight away, with flag.focus.workflow still at custom. The other route in is the focus wizard’s “I’m preparing a bundle to hand to them” answer, which sets the workflow to other_handoff; that’s what a self or guardian user needs, since for them the flag defaults to off and the route returns 403 until they answer it or switch the flag on under Settings → Developer Options → Feature flags.Annotate as you review
- Tags:
concern,positive,follow_up,other - Visibility:
export(will appear in the bundle) orprivate(never leaves your install) - Markdown: linkify cited evidence; the markdown renders in the recipient’s view too
export-visibility note explaining the headline concern in neutral language, then a private note for your own thinking. Both stay attached to the same app on your install; only the first is in the bundle.Export the bundle
- The apps to include (default: all)
- Whether to include your privacy profile (the tolerances you assessed against — useful for explaining why you flagged what you flagged)
- The free-text attribution field (your name as it’ll appear next to your annotations on the recipient’s view; defaults to your friend if blank)
private, your audience or goal selections, your flag overrides, your AI provider configuration or keys, your notification preferences.Share the bundle securely
- End-to-end-encrypted messaging (Signal, iMessage)
- End-to-end-encrypted email
- Direct file transfer over a trusted local network
cat-readable.See Security & trust → Audit-bundle export threat model for the full reasoning.Recipient imports the bundle
version field guards against schema mismatches: if their install is older than yours, the import refuses with a clear upgrade required message rather than silently misparsing.What success looks like
private notes stay yours; the recipient’s response notes stay theirs. No central server, no account creation, no ongoing data flow — just one JSON file passed once.